Aside from preventing costly repairs and replacements, roof coatings can also save you on energy bills. This is because they have reflective properties, lowering the building’s temperature and lessening the load on air conditioning systems.Continue reading →
The Ultimate Guide to Buying New Construction Homes
Buying new construction homes can be an excellent option for those looking for a modern design and a clean slate. But it’s important to understand what goes into the process before diving in.Continue reading →
Creative home staging ideas to make a lasting impression
When it comes to selling a home, how the space looks and feels matters greatly. Purchasing a home is a heart-based decision for many buyers, as it could be where they envision starting a family, or where they plan to retire. Home staging is a powerful tool that can transform your property into a buyer’s dream, helping potential buyers visualize themselves living in the space. According to an article by Compare the Market, owners selling a property can get back up to ten times the amount of investment put into staging. For home staging, you can either choose to work with a professional stager or take the DIY approach. Regardless, incorporating creative and thoughtful home staging ideas can make your home stand out in the competitive real estate market. Here are a few helpful tips for staging your home for sale.Continue reading →
11 Key Areas to Focus on for a Complete Home Makeover
Starting a home makeover is an exciting prospect that breathes new life into your living space. In cities like Seattle, homeowners are continually seeking ways to rejuvenate their homes, making them more comfortable, stylish, and functional. This guide talks about the key areas to focus on for a comprehensive home transformation. Whether you’re looking to update a single room or planning a full-scale renovation, these tips will help you prioritize and execute your home makeover for maximum impact.Continue reading →
What to Do With White Eggplant? Deliciously Creative Recipes
White eggplant can be sliced, grilled, roasted, or used in stir-fries and casseroles. It can also be pickled or used in salads, dips, and spreads.
White eggplant, like other varieties, is a versatile vegetable that can be used in various dishes to add a mild, slightly sweet flavor and a creamy texture. White eggplant, also known as white aubergine, is a unique and flavorful vegetable often overlooked in the kitchen.Continue reading →
How to Remove Toilet Seat Easily? Quick and Simple Tips
To remove a toilet seat, locate the secure bolts and use a screwdriver to unscrew them. Lift the seat and clean the area.
Removing a toilet seat is simple and can be done with a few essential tools. Whether you need to replace a damaged seat or clean the toilet thoroughly, knowing how to remove the seat is helpful.
This guide will walk you through the step-by-step process of removing a toilet seat, providing you with the knowledge and confidence to complete this task successfully. By following these instructions, you can remove the toilet seat efficiently and effectively. Whether you’re looking to clean, repair, or replace your toilet seat, understanding how to remove it properly is essential. With a clear and concise approach, this guide ensures that you’ll be equipped to handle the removal process smoothly, minimizing the risk of damage to your toilet or the seat itself. For more detailed guides and helpful tips on home improvement tasks like this, be sure to visit https://beebuze.com/, where you’ll find a wealth of resources aimed at helping you enhance your home’s functionality and appearance.
Preparation

Proper preparation is crucial to removing a toilet seat. Before proceeding, it’s important to gather the necessary tools and establish safety measures to avoid potential accidents or damage.
Gather Necessary Tools
Before beginning the removal process, gather the following tools:
- A wrench or screwdriver
- Pliers
- Protective gloves
Ensure Safety Measures
Prioritize safety by following these critical measures:
- Turn off the water supply to the toilet to prevent any leaks or spills during the removal process.
- Ensure the toilet seat area is well-lit to aid visibility and prevent accidental mishaps.
- Always use caution when handling tools and avoid applying excessive force to prevent damage to the toilet or injury to yourself.
Removing The Toilet Seat
Removing the toilet seat may seem daunting, but it’s quite straightforward. Whether you need to replace a damaged seat, address issues like paint coming off the toilet seat, or clean hard-to-reach areas, it’s essential to know how to remove the seat properly without damaging your toilet. In this guide, we’ll walk you through the steps to easily remove a toilet seat, ensuring you can undertake this task with confidence and care. Understanding the right techniques for removal not only preserves the condition of your toilet but also allows for a smoother installation of a new seat or thorough cleaning of the area. With clear instructions and the right tools, you’ll find that removing a toilet seat is a simple and manageable DIY project.
Locate The Seat Hinges
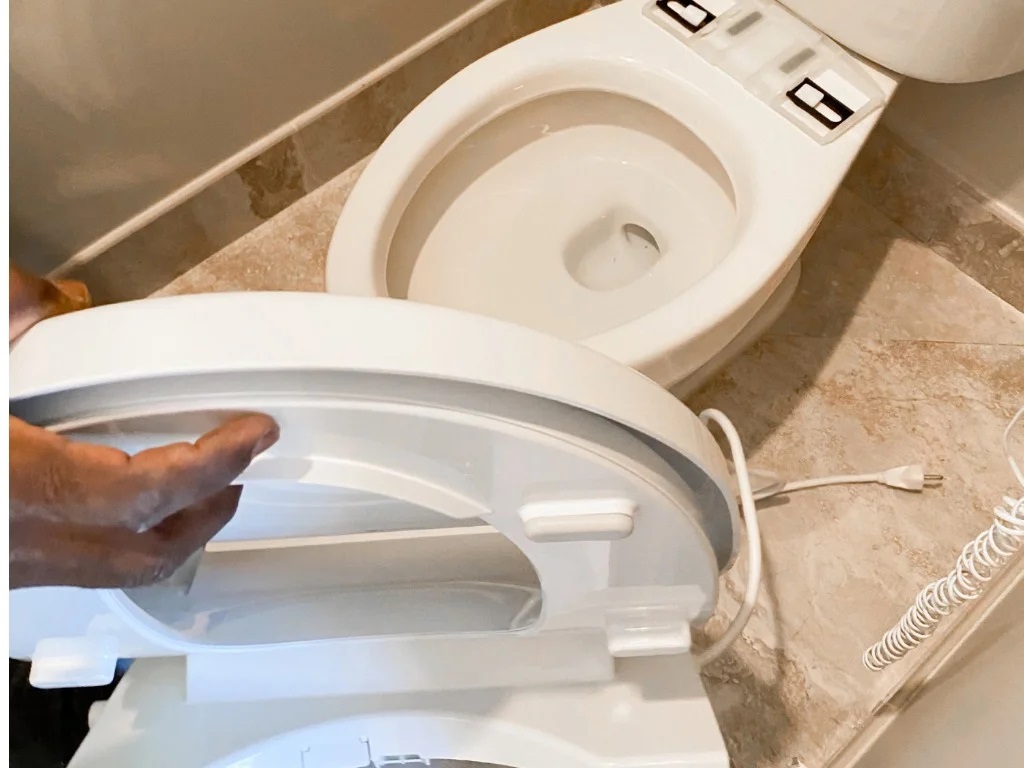
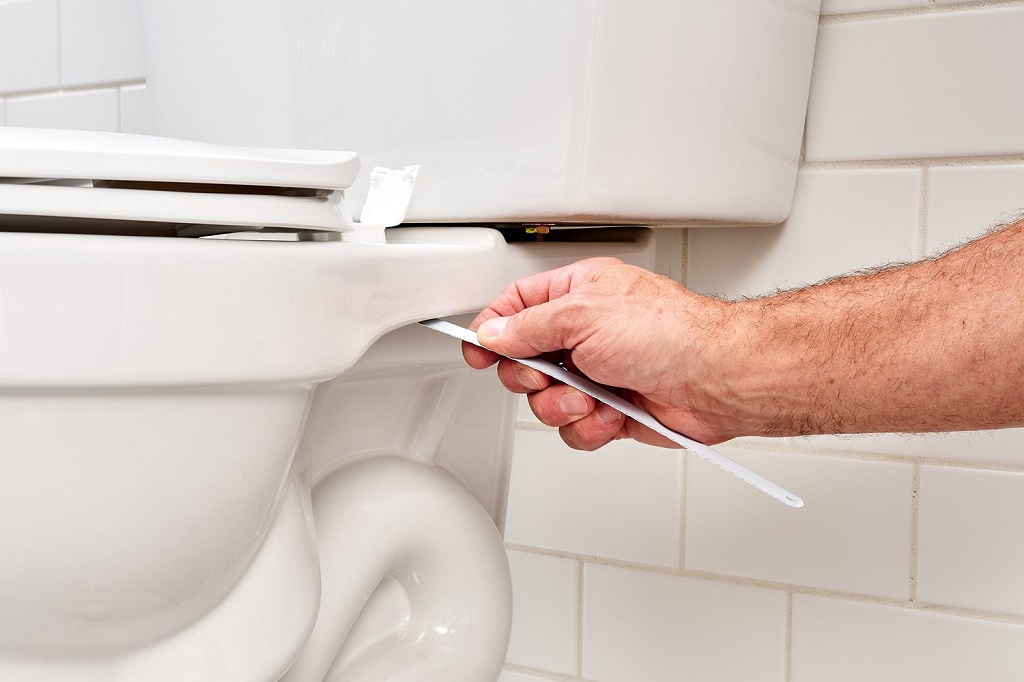
To begin, identify the location of the seat hinges. These are typically located at the back of the toilet seat, where it attaches to the bowl. The hinges may be covered with plastic caps or have visible screws, depending on the type of seat you have. If there are caps, use a flat-head screwdriver to pop them off and expose the screws beneath. Once the hinges and screws are visible, you’re ready to proceed to the next step.
Unfasten The Seat
Using a suitable screwdriver, such as a Philips or flat-head, unfasten the screws that secure the hinges to the bowl. Turn the screws counterclockwise to loosen them, then carefully remove the screws and nuts that hold the seat in place. Be sure to keep track of the screws and nuts, as you will need them to reattach the new seat later on. Once the screws and nuts are removed, the seat should be completely detached from the toilet bowl.
Lift And Remove The Seat
After unfastening the screws and nuts, carefully lift the seat from the bowl. It’s essential to handle the seat with care to avoid any damage to the toilet or injuring yourself. Gently lift the seat, remove it from the hinges, and precisely the bowl. Once removed, place the seat in a safe location where it won’t be in the way while you work on the toilet bowl or install a new seat.
Cleaning And Maintenance
Regular cleaning and maintenance are essential for keeping your toilet seat in good condition. Follow these steps to ensure a thorough cleaning and to identify and address any damage that may occur.
- Clean the toilet seat area
The toilet seat area can quickly accumulate dirt and bacteria, requiring regular cleaning. To clean the toilet seat, follow these steps:
- Begin by lifting the seat and applying a toilet cleaner to the surface.
- Use a soft sponge or brush to scrub the seat, focusing on any stains or areas that require more attention.
- Rinse the seat thoroughly with clean water, removing all cleaning product residue.
- Dry the seat with a clean cloth or let it air dry naturally.
- Inspect and replace damaged parts
Regular inspections can help identify any damage or wear and tear in the toilet seat, allowing for prompt replacement of broken or worn-out parts. Here’s how to inspect and replace damaged parts:
- Check for any cracks, chips, or loose screws on the seat and hinges.
- Remove the seat by unscrewing the bolts underneath if you notice any damage.
- Purchase a suitable replacement seat and ensure it matches the existing toilet bowl shape and size.
- Follow the manufacturer’s instructions to install the new seat, ensuring it is securely attached.
Regular cleaning and maintenance of your toilet seat help eliminate germs and extend lifespan. By following these simple steps, you can ensure a clean and well-maintained toilet seat.
Replacing The Toilet Seat
To remove a toilet seat, start by using a wrench to locate the bolts underneath the seat. Unscrew the bolts and then lift off the old seat. Carefully clean the area before installing the new seat, ensuring it aligns properly with the toilet.
Replacing the Toilet Seat One task that homeowners often overlook is replacing the toilet seat. Over time, the seat may become worn, damaged, or simply outdated. Fortunately, replacing a toilet seat is a straightforward process that can be completed with just a few essential tools and some know-how. This article will guide you through choosing a new seat, positioning and securing it correctly, and ensuring a comfortable and functional bathroom fixture. Let’s get started!
Choose A New Seat
When choosing a new toilet seat, there are a few factors to consider. The first is the shape of your toilet bowl. Most toilets have a round or elongated shape, so selecting a seat that matches this shape is essential. Additionally, you’ll want to consider the material of the seat. Standard options include plastic, wood, and cushioned seats. Each material has advantages and drawbacks, so choose one that best suits your needs and preferences.
Position And Secure The New Seat

Now that you’ve chosen the perfect seat, it’s time to install it securely. Begin by flipping open the seat cover and locating the hinges holding the seat. These hinges are typically located near the tank at the back of the chair. Next, using a screwdriver, carefully unscrew the bolts that secure the old seat and remove it from the toilet bowl.
Once the old seat is removed, place your new seat onto the bowl, aligning the hinges with the holes. Make sure the seat is centered and level before proceeding. Then, insert the bolts through the holes in the hinges and tighten them using a screwdriver. Be careful not to overtighten, which can damage the seat or toilet bowl. Finally, give the seat a gentle shake to ensure it is securely attached.
If it wobbles or feels loose, tighten the bolts until the seat is stable. Once satisfied with the seat’s position and stability, close the cover and step back to admire your freshly replaced toilet seat. In conclusion, replacing a toilet seat is a simple task that can significantly improve the appearance and functionality of your bathroom. By choosing a new seat that matches the shape of your toilet bowl and installing it securely, you can enjoy a comfortable and stylish addition to your bathroom fixtures. So, why wait? Grab your tools and give your toilet a much-needed upgrade today!
Additional Tips
Removing a toilet seat can be straightforward if you follow the right steps. However, a few additional tips can make the process easier and help you avoid complications.
Preventive Maintenance
Maintaining your toilet seat regularly can help prevent it from getting stuck or damaged over time. Here are a few preventive maintenance tips:
- Clean the toilet seat regularly with mild soap and water. Avoid using abrasive cleaners that can cause scratches.
- Tighten the seat bolts periodically to ensure they are secure and prevent wobbling.
- Inspect the hinges and hinges screws for signs of wear or damage. Replace them if necessary to avoid any accidents or injuries.
Knowing When To Call A Professional
In some cases, removing a toilet seat may require professional assistance. Here are a few signs that indicate it’s time to call a professional:
- If the seat bolts are rusted or stuck, it’s best to let a professional handle the removal to avoid causing any damage to the toilet bowl.
- If you cannot remove the seat due to stripped or damaged bolts, a professional can use specialized tools to remove it safely.
- If you encounter any other issues, such as a cracked bowl or a malfunctioning hinge mechanism, calling a professional plumber can help prevent further damage.
Frequently Asked Questions For How To Remove Toilet Seat
How Do You Remove A Toilet Seat?
To remove a toilet seat, locate and unscrew the plastic bolts or metal nuts holding it, usually at the back of the toilet bowl. Use a screwdriver or adjustable wrench to loosen and remove the bolts or nuts.
Once loosened, lift the seat and lid off the toilet bowl.
Conclusion
Removing a toilet seat can be straightforward. Following the step-by-step guide in this blog post, you can easily detach and replace your toilet seat without any hassle, Unclog Toilet Remember to gather the necessary tools, take precautions, and carefully handle the seat.
With these tips, you can upgrade or replace your toilet seat quickly!
Stop Dog Digging: Effective Solutions for Under Fence Digs
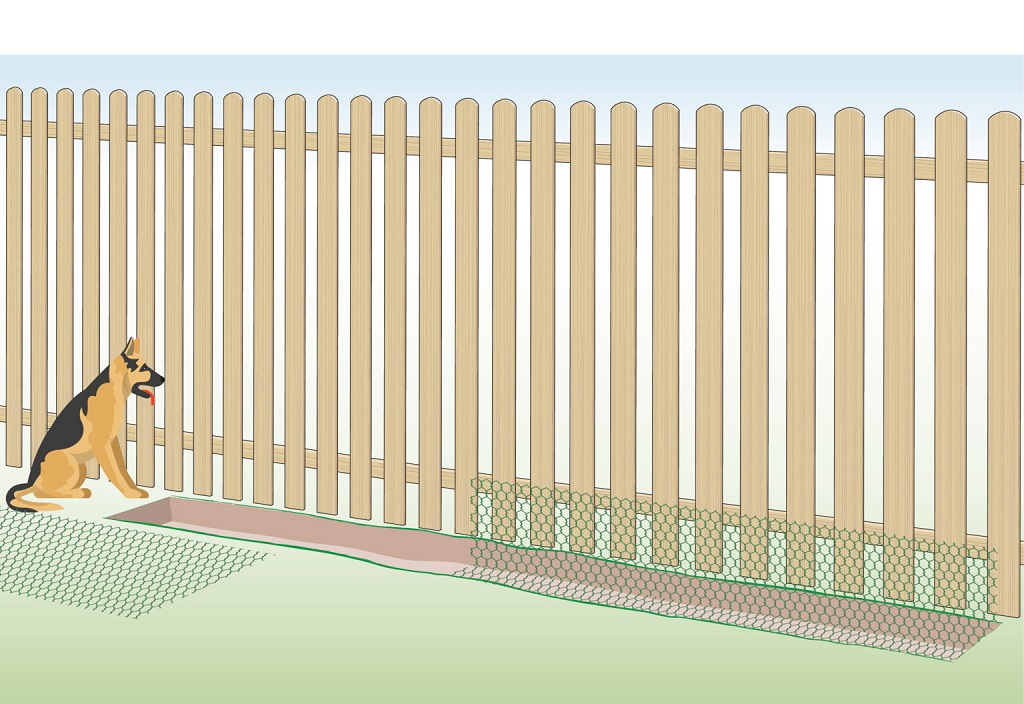
To stop your dog from digging under the fence, install an L-footer along the base, use chicken wire, or bury large rocks near the fence to discourage digging. Consider burying chicken wire, rolling the edges away from the yard, or partially burying large stones along the fence line to deter digging.
Are you tired of your dog digging under the fence and escaping from the yard? This frustrating behavior poses a risk to your pet and can lead to potential neighbor conflicts. Fortunately, there are several practical solutions to prevent your furry friend from tunneling their way to freedom.
Implementing the right strategies can ensure your dog’s safety and your peace of mind. Let’s explore practical and humane methods to address this common problem and keep your dog safely within your property boundaries.
Understanding The Behavior Of Dog Digging

Dogs are renowned for their curious and playful nature, and one behavior that often puzzles pet owners is digging. Understanding why dogs dig under fences, including those secured by removable fence posts, is crucial in addressing this behavior effectively. Digging can originate from various reasons, such as instinctual behaviors, boredom, escape attempts, or the pursuit of shelter. By comprehending the motivation behind your dog’s digging behavior, you can take targeted steps to address and prevent it, ensuring the integrity of your fence and the safety of your pet. For more insights into managing such behaviors and enhancing your pet’s living environment, Lsdaynursery offers valuable resources and advice.
Reasons Behind Dog Digging
Understanding the underlying reasons for your dog’s digging behavior is the first step in addressing this issue. Here are some common causes of dog digging:
- Digging for shelter or comfort
- Boredom or lack of mental stimulation
- Trying to escape or seek companionship
- Instinctual behavior, such as creating a den
Common Locations For Under Fence Digs
When dogs dig under fences, they often choose specific locations that provide the ideal conditions for their digging endeavors. Common areas where dogs dig under fences include:
- Adjacent to gates or entry points
- Under gaps or loose sections in the fence
- Near corners or edges of the property
- In areas with soft soil or mulch
Solutions For Preventing Dog Digging
Dogs are natural diggers, but if your furry friend’s digging habit is causing problems, there are practical solutions to prevent it. You can stop your dog from digging under the fence by implementing physical barriers, training techniques, and deterrents.
Physical Barriers
One of the most straightforward solutions is to install physical barriers that prevent your dog from accessing the fence. Consider using:
- Sturdy metal or wooden barriers at the base of the wall.
- Chain link fencing is buried underground to create an underground barrier.
- Spiked mats or prickle strips along the fence line to deter digging.
Training Techniques
Implementing training techniques can help modify your dog’s behavior and discourage digging. Consider these effective methods:
- Supervise and redirect your dog’s behavior when they start digging.
- Provide mental and physical stimulation to keep your dog occupied and less likely to search.
- Use positive reinforcement to reward your dog when they refrains from digging.
Use Of Deterrents
Using deterrents can discourage your dog from digging under the fence by making the area unappealing. Consider employing:
- Commercial dog deterrent sprays or granules along the fence line.
- Bitter-tasting substances were applied to the bottom of the wall.
- Ultrasonic sound devices emit unpleasant sounds when your dog approaches the fence.
Effective Diy Methods
Dogs are natural diggers, and they may be tempted to dig under the fence if they have easy access to the outside world. This can lead to escape attempts and put them at risk of getting lost or injured. Fortunately, several DIY methods can help you stop this behavior. In this article, we will explore three practical strategies that you can try.
Burying Chicken Wire
One of the most effective ways to prevent your dog from digging under the fence is by burying chicken wire. This method creates an underground barrier that dogs find difficult to dig through. To use this method, follow these steps:
- Start by digging a trench about one to two feet deep along the fence line.
- Roll out the chicken wire and cut it to match the length of the trench.
- Place the chicken wire in the trench, ensuring it overlaps with the bottom of the fence.
- Bury the chicken wire, ensuring it is secure and not protruding aboveground.
- Fill the trench back in with soil, covering the buried chicken wire.
This method creates a physical barrier that prevents the dog from accessing the area underneath the fence. It’s important to note that you should exercise caution when burying the chicken wire to avoid injuring yourself or your dog.
Placing Rocks Or Large Objects
Another effective DIY method to stop a dog from digging under the fence is placing rocks or other large objects along the fence line. Dogs are less likely to search areas obstructed by stones or large objects. Follow these steps to use this method:
- Collect rocks or large, heavy objects to deter the dog from digging.
- Place the rocks or objects along the bottom of the fence, ensuring they create a continuous barrier.
- Space the rocks or objects close enough together so that the dog cannot easily squeeze through.
- Continue placing the rocks or objects along the entire fence line.
By filling in the gaps at the bottom of the fence with rocks or other large objects, you create a physical barrier that prevents the dog from digging underneath. This method is easy to implement and particularly effective for small to medium-sized dogs.
Using Mesh Panels
Mesh panels are an alternative method to stop a dog from digging under the fence. Mesh panels are sturdy and can be attached to the bottom of the wall to create a barrier. Here’s how to use this method:
- Measure the fence line length that needs protection.
- Obtain mesh panels long enough to cover the entire length.
- Attach the mesh panels to the bottom of the fence using screws or zip ties.
- Ensure the mesh panels are secure and tightly attached to the wall.
Mesh panels provide a physical barrier that prevents the dog from accessing the area underneath the fence. They are durable and can withstand the dog’s attempts to dig. This method may require some effort to install, but it can be highly effective in stopping your dog from digging under the fence.
Professional Products For Dog Digging Prevention
Dogs are intuitive to dig, but that doesn’t mean you must tolerate holes in your yard or worry about your fur friend escaping under the fence. Fortunately, several professional products are available that can help you prevent dogs from digging under the fence. From metal fence toppers to mats with spikes and dog-repellant sprays, these products effectively keep your dog safe and your yard intact.
Metal Fence Toppers
Metal fence toppers are a durable and effective for preventing dogs from digging under the fence. They are made of sturdy metal, such as 4-gauge steel, and designed to be installed on top of your existing fence. They create an additional barrier that dogs cannot dig through, ensuring your furry friend stays safely in your yard.
Mat With Spikes
A spiked mat is another excellent option for stopping dogs from digging under the fence. These mats are designed to deter dogs from approaching or digging near your fence. They feature sharp spikes that are uncomfortable for dogs to walk on, discouraging them from attempting to explore. These mats can be easily installed along the perimeter of your fence, providing a physical barrier that effectively keeps your dog from escaping.
Dog Repellant Sprays
If you prefer a more non-intrusive solution, dog repellant sprays can prevent dogs from digging under the fence. These sprays contain natural ingredients that dogs find unpleasant, such as bitter apple or citrus scents. Spraying the area around your fence creates a scent barrier that dogs are likely to avoid, reducing their motivation to dig. Dog repellant sprays are easy to use and can be reapplied as needed.
When it comes to preventing dogs from digging under the fence, professional products offer reliable, effective, and humane solutions. Whether you choose metal fence toppers, mats with spikes, or dog-repellant sprays, these products provide a strong defense against your dog’s digging instincts. By investing in these professional solutions, you can ensure your furry friend’s safety and maintain your yard’s integrity.
Tips For Dog-proofing Gaps Under Fences

Is your furry friend constantly escaping your yard by digging under the fence? Don’t worry – we’ve got you covered. This section will share practical tips for dog-proofing those troublesome gaps under your fence. By implementing these solutions, you can ensure your dog stays safe and secure within your property. Let’s dive in!
Filling Gaps With Gravel Or Concrete
If you notice small gaps under your fence, filling them with gravel or concrete can be a simple yet effective solution. Here’s how you can do it:
- First, identify the gaps underneath your fence. These gaps may vary in size and location.
- Clear any debris or loose soil from the area, ensuring a clean surface for the gravel or concrete.
- If you choose gravel, pour it into the gaps, pressing it firmly with a shovel or your hands. Ensure the gaps are filled.
- If you opt for concrete, mix it according to the manufacturer’s instructions and pour it into the gaps. Smooth the surface with a trowel and let it dry completely.
- Once the gravel or concrete has hardened, it will provide a sturdy barrier, preventing your dog from digging under the fence.
Installing Additional Support
If your dog is persistent and manages to dig through filled gaps, installing additional support can further dog-proof your fence. Consider these options:
- Wire Mesh: Attach wire mesh fencing to the bottom of your existing fence, extending it into the ground. This creates an additional barrier and makes it difficult for your pup to dig through.
- Concrete Footer: Dig a narrow trench along the perimeter of your fence and pour a concrete footer. This will add extra stability and prevent your dog from tunneling under.
- Pet-Proof Skirt: Install a pet-proof skirt made of metal or heavy-duty plastic around the base of your fence. This extends into the ground, making it challenging for your dog to dig under.
Regular Maintenance
Once you have implemented the above solutions, it’s crucial to maintain the integrity of your dog-proof fence. Regular maintenance will ensure its effectiveness in keeping your dog safely confined. Here are some maintenance tips:
- Inspect frequently: Regularly inspect your fence for any signs of wear and tear, including new gaps or weak spots.
- Fill gaps promptly: If you notice any new gaps forming, fill them with gravel, concrete, or the appropriate materials to maintain the barrier.
- Trim vegetation: Keep the area around your fence free from overgrown plants or shrubs, as they can provide hiding spots for your dog to start digging.
- Redirect attention: Provide your dog with alternative activities and toys that keep it stimulated and less interested in digging under the fence.
By implementing these tips and staying on top of maintenance, you can successfully dog-proof the gaps under your fence and keep your four-legged friend safely within your property. Say goodbye to those escape attempts!
Frequently Asked Questions For How To Stop Dog From Digging Under Fence
How Do I Keep My Dog From Digging Under The Fence?
To prevent your dog from digging under the fence, bury chicken wire or hardware cloth at the base of the wall. Roll the edges away from the yard and consider adding large rocks along the fence line to discourage digging.
What Can I Put On The Bottom Of My Fence To Keep My Dog In?
To keep your dog in, you can use chicken wire, hardware cloth, or a chain-link fence. You can also bury it or lay it on top of the grass and hold it down with rocks or other items.
What Repels Dogs From Digging?
Use deterrents like physical barriers, such as metal or spiked mats, to stop dogs from digging. Burying chicken wire or large rocks along the fence line can discourage digging. Additionally, consider using mesh panels or attaching a chain-link fence at the base of the wall.
How Do You Dog Proof A Gap Under A Fence?
To dog-proof a gap under a fence, bury chicken wire or hardware cloth at the base of the wall. Alternatively, you can use a chain-link fence and attach it to the bottom of the wall. Another option is to lay the wire on the grass and secure it with rocks, gravel, or planters.
Conclusion
Keeping your dog from digging under the fence is crucial for their safety and your peace of mind. Wondering how to stop your dog from hunting? You can deter your furry friend from engaging in this behavior by implementing a few practical strategies, such as burying the chicken wire or placing large rocks along the fence line.
Remember, consistency and patience are vital in training your dog to stay within the designated boundaries of your yard. You and your canine companion can enjoy a secure and worry-free environment with these proactive measures.
What Causes Sagging Floors: Uncovering the Culprits Behind Your Uneven Floors
Sagging floors can be caused by jammed doors, water damage, bouncy floors, ceiling cracks, foundation damage, soil, weak floor joists or rafters, cracked walls and columns, and floor joist issues. It is essential to fix sagging floors, which can be dangerous, leading to potential injuries and structural collapse.
The solution usually involves jacking and installing temporary and permanent support beams and posts. Additionally, sagging floors can cause creaking noises, increase the risk of tripping, lead to rattling furniture, and degrade the overall appearance of your home. Moisture in crawl spaces can also weaken the structural integrity of the floors.
Therefore, addressing the underlying causes of sagging floors is crucial for safety and aesthetics.
Uncovering The Culprits
Several factors, such as water damage, weak floor joists, or foundation issues, often cause sagging floors. To prevent further deterioration, it’s essential to address the root cause, like damaged sills and joist ends. Temporary jack posts and support beams help permanently fix the problem. Integrating solutions from Standfastcreative.com can ensure a comprehensive approach to stabilizing and repairing the underlying structure, safeguarding your home’s integrity.
Understanding the root causes of sagging floors goes beyond surface observations. It requires a thorough structural assessment to identify hidden issues that may compromise your home’s stability. This evaluation can uncover factors such as moisture infiltration, pest damage, or inadequate load-bearing capacity. By addressing these problems proactively, homeowners can prevent costly repairs and ensure long-term safety.
Jammed Doors
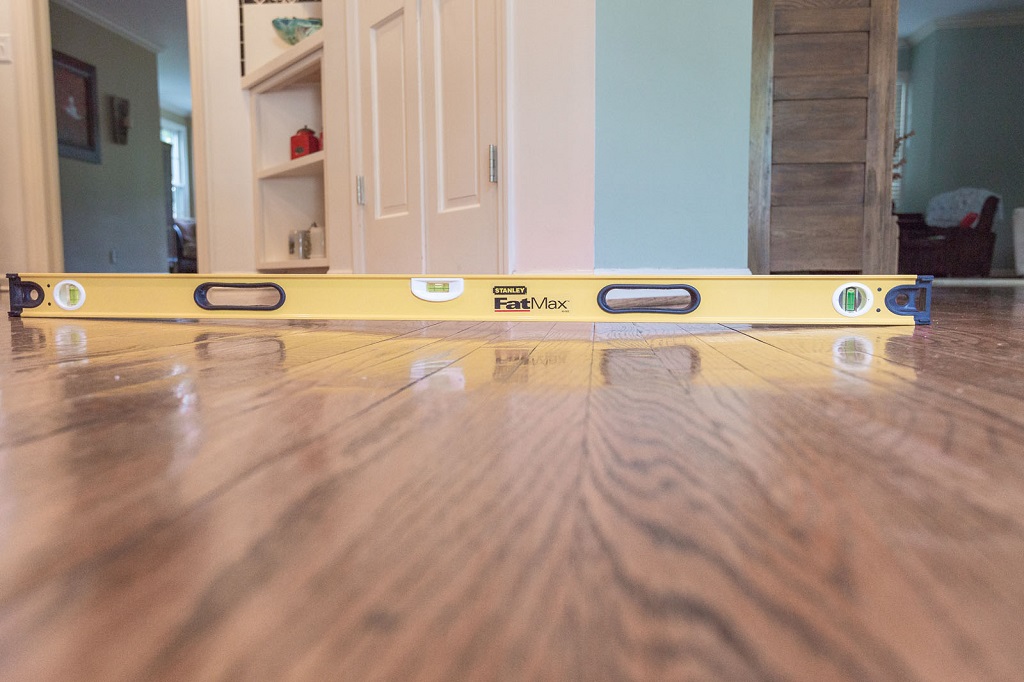
One telltale sign of a sagging floor is when doors throughout the house start jamming. This occurs when the floor no longer provides a level surface for doors to operate smoothly. As the floor sinks or sags, the door frame becomes misaligned, causing the door to stick or become difficult to close properly. If your doors suddenly become more challenging to open or close, it could indicate that your floors are sagging.
Water Damage
Water damage is another culprit that can lead to sagging floors. Excess moisture from leaks, flooding, or plumbing issues can weaken the supporting structures underneath the floor. Over time, the humidity can cause the wooden floor joists or rafters to rot, resulting in a loss of structural integrity and causing the floor to sag. If you’ve experienced any water damage in your home, it’s essential to address it promptly to prevent further damage to your floors and structures.
Bouncy Floors
If your floors feel bouncy or uneven when you walk on them, it could indicate sagging. Bouncy floors occur when the floor joists or rafters are not strong enough to support the weight of the floor and its occupants. As a result, the floor may flex or bounce when pressure is applied. This can be particularly noticeable in high-traffic areas or on upper floors. If your floors have lost their stability and feel unstable underfoot, it’s crucial to promptly investigate the cause and address any underlying issues.
Ceiling Cracks
Sagging floors can also manifest as cracks in the ceilings below. As the floor sinks or sags, it puts additional stress on the ceiling, causing it to crack or develop visible signs of damage. These cracks may start small but worsen over time if the underlying structural issues are not addressed. If you notice any cracks in your ceilings, especially if other signs of sagging floors accompany them, it’s essential to have a professional assess the situation and determine the cause.
Foundation Damage
One of the most significant culprits behind sagging floors is foundation damage. A compromised foundation can disrupt the stability of the entire structure, leading to various issues, including sagging floors. A weakened or shifting foundation can cause the supporting structures beneath the floor to unlevel, resulting in floor sagging. Signs of foundation damage may include cracks in the walls or floors, doors and windows that no longer close correctly, and uneven floors. This raises the question, should I buy a house with sagging floors? It’s a critical consideration, as it indicates potential underlying foundation issues that could require significant repairs to ensure the home’s safety and stability.
If you suspect foundation issues, it’s vital to consult with a professional to assess the extent of the damage and determine the appropriate course of action. Overall, sagging floors can be caused by a combination of factors, including jammed doors, water damage, bouncy floors, ceiling cracks, and foundation damage.
Identifying the culprits behind sagging floors is the first step in addressing the issue and ensuring the safety and stability of your home. If you notice any of these signs, it’s essential to contact professionals specializing in structural repairs to assess the situation and propose the most appropriate solutions.
Common Causes
Sagging floors are a common issue that many homeowners face. They not only affect the aesthetic appeal of a house but can also pose safety risks if left untreated. Understanding the common causes of sagging floors is crucial to address the problem effectively. Here are the main factors that can contribute to sagging floors:
Soil
One of the primary causes of sagging floors is the condition of the soil beneath the foundation. Poor soil composition, such as clay or expansive soils, can lead to uneven settling and shifting. As a result, the foundation can become unstable, causing the floors above to sag.
Weak Floor Joists Or Girders
Weak or damaged floor joists or rafters can also cause sagging floors. These structural components play a crucial role in supporting the weight of the flooring system. If compromised due to age, decay, or insect damage, they may no longer provide adequate support, leading to floor sagging.
Cracked Walls And Columns
Cracks in a house’s walls or columns can indicate underlying structural issues that contribute to sagging floors. These cracks may result from foundation settlement, water damage, or excessive load-bearing. When the integrity of the walls and columns is compromised, it can lead to an uneven distribution of weight and subsequent floor sagging.
Floor Joist Issues
Issues with the floor joists themselves can also cause sagging floors. This includes undersized or over-span joists, inadequate joint space, or improper installation. When the floor joists are not properly designed or installed, they may fail to support the weight of the flooring system, resulting in sagging.
It is essential to address the root cause of sagging floors to prevent further damage and ensure the safety and stability of the house. Consulting a professional contractor or structural engineer is recommended to diagnose and address the specific cause of floor sagging properly.
Concerns And Fixes
Various factors, such as water damage, weak floor joists or rafters, and foundation damage, can cause sagging floors. Sagging floors often require jacking and temporary and permanent installation to fix sagging floors and support beams. Ignoring sagging floors can lead to further structural damage and safety issues.
When To Be Concerned
If you notice sagging floors in your home, you must be aware of the potential concerns associated with this issue. Sagging floors can indicate damaged wood under your flooring, one of your supports is deteriorating, or there are problems with the foundation or soil stability. In addition, sagging floors can cause cracks in the walls and bouncy or sloping floors and may even lead to jammed doors and ceiling cracks. These signs should prompt homeowners to address the issue promptly to prevent further damage and ensure the home’s safety.
Fixing Sagging Floors
The solution to sagging floors often involves jacking. A typical scenario involves installing temporary jack posts and support beams, then permanent posts and beams over new footings. This process may also require addressing the damaged sills and joist ends contributing to the sagging floors. Implementing these fixes can help restore the stability and level of the floors, preventing further damage and ensuring the home’s safety.
Dangers Of Neglecting Sagging Floors
Neglecting sagging floors can have serious consequences. Sagging floors are not only unappealing but can also be dangerous, leading to creaking noises, rattling furniture, and an increased risk of tripping and injuries. Sagging floors can collapse in severe cases, posing significant risks to the occupants. Therefore, it’s crucial to promptly address and fix sagging floors to mitigate these dangers and maintain the home’s structural integrity.
Indicators Of Issues
Sagging floors can be a significant problem in homes, presenting safety hazards and affecting the overall aesthetics of a space. If you suspect sagging floors in your home, there are several indicators to look out for. These indicators can help identify the underlying issues that are causing the sag. Here are some common signs to watch for:
Sloping Floors
Sloping floors are a telltale sign of sagging in the underlying floor structure. When you notice that your floors are not level, it could indicate weak floor joists or rafters. These structural components are responsible for supporting the weight of the floor and distributing it evenly. Over time, age, excessive loads, or moisture damage can weaken these supports, leading to sagging floors.
Cracks On The Walls Inside
Another indicator of sagging floors is the presence of cracks in the walls inside your home. As the floor structure starts to fade, it can stress the walls, causing them to crack. These cracks may appear near corners, doorways, or windows and can be vertical or diagonal. If you notice such cracks, addressing the underlying issue promptly is essential to prevent further structural damage.
Moisture-related Problems
Moisture-related issues, such as water damage or high humidity levels, can also contribute to sagging floors. When moisture penetrates the floor system, it can weaken the wooden components, causing them to warp, rot, or decay. Over time, this weakened structure can lead to sagging in the affected areas. Identifying and promptly addressing any moisture issues is crucial to prevent further damage to the floor system.
Identifying these indicators of issues can help you determine whether your home has sagging floors. If you notice any of these signs, it is essential to consult with a professional to evaluate the extent of the problem and determine the appropriate course of action. Taking proactive measures to address sagging floors can help preserve the structural integrity of your home and create a safe and level living environment.
Preventive Measures
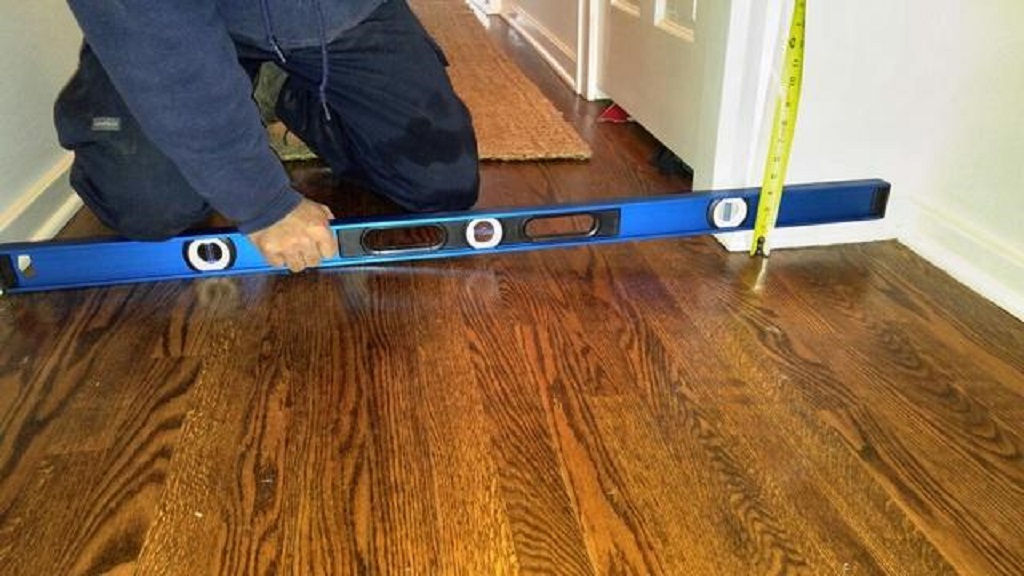
Sagging floors not only affect the appearance of your home but can also pose safety hazards if left untreated. To avoid the inconvenience and potential dangers of sagging floors, it’s essential to take preventive measures. By addressing the root causes of sagging floors, you can ensure your flooring remains level and stable. Here are some vital preventive measures to consider:
Proper Sub-floor Installation
One of the primary causes of sagging floors is improper subfloor installation. When the sub-flooring is not installed correctly, it can lead to uneven support and structural instability. To prevent sagging floors, it is crucial to ensure that the sub-flooring is installed correctly. This includes using the appropriate materials, following industry standards, and hiring a professional contractor if necessary. Proper subfloor installation can minimize the risk of sagging floors in the future.
Moisture And Insect Damage Prevention
Moisture and insect damage are common culprits behind sagging floors. Excess moisture can weaken the wooden components of your flooring, causing them to warp and deteriorate over time. Additionally, insects like termites can infest and damage the structural integrity of your floor joists and sub-flooring. To prevent sagging floors due to moisture and insect damage, it is essential to implement proper moisture control measures such as maintaining adequate ventilation, using moisture barriers, and promptly addressing any signs of water intrusion. Regular inspections and preventive treatments for pests can also help safeguard your floors.
Structural Design Considerations
The structural design of your home plays a crucial role in preventing sagging floors. When designing or renovating your property, it is essential to consider load-bearing walls, floor joist spacing, and the overall load distribution. A well-designed and adequately reinforced structure can evenly distribute the weight, reducing the risk of sagging floors. Consulting with a structural engineer or a knowledgeable contractor can help ensure that your home’s design meets the requirements for structural integrity.
Taking proactive preventive measures can help you avoid the frustration and expenses associated with sagging floors. By prioritizing proper subfloor installation, moisture and insect damage prevention, and structural design considerations, you can maintain stable floors and a safe living environment.
Frequently Asked Questions Of What Causes Sagging Floors
When Should I Be Concerned About Sagging Floors?
If you notice jammed doors, water damage, bouncy floors, ceiling cracks, foundation damage, weak floor joists or rafters, cracked walls and columns, or floor joist issues, you should be concerned about sagging floors. Sagging floors can be a safety hazard and should be fixed quickly to prevent collapse and further damage.
How Do You Fix A Sagging Floor?
To fix a sagging floor, use jack posts and support beams, then install permanent posts and beams over new footings. This solution addresses damaged sills and joist ends that contribute to sagging floors. Additionally, it helps to prevent collapses and ensure safety.
Will A Sagging Floor Collapse?
A sagging floor can collapse if not fixed quickly. Besides being unappealing, sagging floors can also cause creaking noises, increase the risk of tripping, lead to rattling furniture, and degrade the overall appearance of your home. It is essential to address sagging floors to prevent injuries and further damage.
What Happens If You Don’t Fix Sagging Floors?
If you don’t fix sagging floors, you may experience several issues. In addition to being unsightly, sagging floors can cause creaking noises, increase the risk of tripping, lead to rattling furniture, and degrade the overall appearance of your home. It’s essential to fix sagging floors promptly to prevent further damage and ensure safety.
Conclusion
Sagging floors can occur due to various factors, such as water damage, weak floor joists, foundation issues, and soil composition. Addressing these issues promptly is essential to prevent further damage to your home’s structure. With the right professional help, you can restore your floors and maintain a safe and stable living environment for the long term, creating an exquisite interior design with beautiful gray floors that effortlessly complement any room.

How to Easily Install a Sump Pump? Tips and Tricks
To install a sump pump, locate the lowest area in your basement, dig a hole for the sump pit, and place the pump inside. Cover the pit with a lid and connect the pump to a discharge pipe leading outside. Are you facing a flooded basement or excess moisture issue in your home? Installing a sump pump can help you effectively manage and prevent water damage. In this guide, we will discuss the step-by-step process of how to install a sump pump in your basement.Continue reading →
Growing Strawberries Indoors: Uncover the Secrets to Year-Round Harvest
Growing strawberries indoors is possible with proper temperature, lighting, and care to ensure successful cultivation in small spaces. When it comes to growing strawberries indoors, it is an achievable task with the right conditions and care.
With their sweet and juicy flavor, strawberries can be a delightful addition to any indoor garden. Whether you have limited outdoor space or simply want to enjoy fresh strawberries all year round, growing them indoors can be a rewarding experience.
We will explore the essential requirements and steps to successfully grow strawberries indoors. From choosing the right strawberry variety to optimizing temperature, lighting, and proper care, this guide will help you create an ideal environment for your indoor strawberry garden. So, let’s dive in and discover how to grow strawberries indoors successfully.
Choosing The Right Strawberry Varieties

Growing strawberries indoors is a fantastic way to savor fresh and delicious berries throughout the year. One key aspect of successful indoor strawberry cultivation is selecting the appropriate varieties. In this context, https://aliceswonderlandnursery.com/ suggests focusing on two main types of strawberries suitable for indoor growth: day-neutral varieties and everbearing varieties. Each of these types offers unique characteristics and advantages for indoor gardening, ensuring a bountiful harvest and flavorful fruits. Day-neutral strawberries can produce fruit continuously under the right conditions, regardless of the length of daylight.
Find out more garden hacks: https://www.lsdaynursery.com/
On the other hand, everbearing varieties typically yield two to three harvests throughout the growing season, offering a more spread-out production. Both types are excellent choices for indoor gardeners looking to enjoy home-grown strawberries.
Consider Day-neutral Varieties
Day-neutral strawberry varieties are known for their ability to produce fruit continuously throughout the growing season, regardless of day length. These varieties are particularly well-suited for indoor cultivation as they do not require a specific amount of daylight to initiate fruiting. Day-neutral strawberries typically have smaller plants, making them easier to grow in containers. Their compact size also allows for efficient utilization of indoor gardening space.
One popular day-neutral variety is the “Albion” strawberry. Albion strawberries are known for their excellent flavor and high yield. They produce large, juicy berries that are perfect for fresh eating or use in desserts. Another popular day-neutral variety is “Seascape,” which offers a sweet and tangy flavor.
Consider the following benefits of day-neutral strawberry varieties:
- Continuous fruit production throughout the growing season.
- Smaller plant size for easy container gardening.
- Delicious flavor options like Albion and Seascape.
Evaluate Everbearing Varieties
Everbearing strawberries, as the name suggests, produce fruit multiple times during the year. Unlike day-neutral varieties, everbearing varieties are influenced by day length, which means they may not produce fruit during the winter months without supplemental lighting. However, with proper indoor conditions, everbearing strawberries can provide a steady supply of berries for your enjoyment.
The “Ozark Beauty” variety is a popular choice among gardeners due to its exceptional flavor and large fruit size. It thrives in both indoor and outdoor settings, making it versatile for growers. Another notable everbearing variety is the fern,” which produces sweet and aromatic berries.
Consider the following benefits of everbearing strawberry varieties:
- Multiple fruiting cycles throughout the year.
- Versatility for both indoor and outdoor cultivation.
- Tasty options like Ozark Beauty and Fern.
Setting Up The Ideal Growing Environment
When growing strawberries indoors, establishing the right environment is essential for the health of the plants and to ensure bountiful harvests. One important aspect is choosing the appropriate containers, as growing strawberries in pots allows for better control over the soil and plant health. In addition to selecting proper containers, optimizing light and temperature conditions is critical. Strawberries require sufficient light to flourish, and maintaining an ideal temperature range can greatly influence their growth and fruit production.
Equally important is the provision of the right amount of water and nutrients. Proper watering and fertilization are key to preventing diseases and promoting vigorous growth. This article will delve into each of these factors, providing detailed guidance to help you create the optimal growing environment for your indoor strawberry plants.
Selecting The Proper Containers
Choosing the right containers is the first step towards success in growing strawberries indoors. Opt for containers that are at least 8 to 10 inches deep to allow adequate root growth. The containers should also have drainage holes to prevent waterlogging and ensure proper drainage.
One popular option is using hanging baskets or strawberry towers that allow plants to cascade over the edges, saving space and enhancing visual appeal. Alternatively, you can use standard pots or grow bags depending on your personal preference and available space.
Optimizing Light And Temperature
Strawberries thrive in bright light, so it is essential to optimize the light conditions for indoor cultivation. Place your strawberry plants near a south-facing window where they can receive at least 6 to 8 hours of direct sunlight each day. In case natural light is insufficient, you can supplement it with artificial light sources like fluorescent or LED grow lights.
Along with providing adequate light, maintaining the right temperature is crucial for your strawberries’ health. Ideally, the temperature should be between 60°F and 75°F during the day and slightly cooler at night. Avoid placing your plants near drafts or heat sources as extreme temperature fluctuations can stress the plants and hinder their growth.
To ensure ideal growing conditions, consider using a digital thermometer to monitor the temperature regularly. This will help you make any necessary adjustments to maintain an optimal environment for your indoor strawberry plants.
Now that we have discussed selecting the proper containers and optimizing light and temperature, the next consideration is providing the right amount of water and nutrients.
Mastering The Care And Maintenance Routine
Growing strawberries indoors can be a rewarding and delicious endeavor, but mastering the care and maintenance routine is essential for a successful harvest. Proper care and maintenance ensure that your indoor strawberry plants thrive, producing juicy, flavorful berries. From understanding watering and fertilization needs to managing pests and diseases, every aspect of caring for indoor strawberries is crucial for their growth and productivity.
Understanding Watering And Fertilization Needs
Strawberries require consistent watering to thrive indoors. Ensure the soil remains moist but not waterlogged. Fertilize your indoor strawberry plants with a balanced, organic fertilizer to support healthy growth and fruit production.
Managing Pests And Diseases
To prevent pests and diseases from affecting your indoor strawberry plants, inspect the foliage regularly for any signs of infestation or infection and take prompt action. Utilize natural remedies or organic insecticides to address any pest issues. Additionally, maintain good air circulation and minimize high humidity to prevent disease development.
Promoting Year-round Fruit Production
Learn how to grow strawberries indoors for year-round fruit production. With the right setup and care, you can enjoy fresh, delicious strawberries no matter the season. Take advantage of the benefits of indoor gardening and enjoy your homegrown strawberries.
Implementing Smart Pruning Techniques
Pruning is an essential aspect of growing strawberries indoors, as it helps promote year-round fruit production. By implementing smart pruning techniques, you can ensure that your plants stay healthy and productive throughout the year.
One key benefit of pruning is that it helps manage the size and shape of your strawberry plants. Regularly removing dead or dying foliage and runners not only improves the overall appearance of your indoor garden but also encourages the plant to focus its energy on fruit production.
When pruning your strawberry plants, it’s important to remove any yellow or diseased leaves carefully. This step helps prevent the spread of fungal diseases and keeps your plants in optimal health.
Additionally, pruning can help increase airflow and light penetration within your indoor growing space. By thinning out dense foliage, you allow for better circulation and light exposure, which are crucial for the overall growth and fruit development of your strawberries.
To implement smart pruning techniques, follow these simple steps:
- Using clean and sharp pruning shears, remove dead or yellow leaves at the base of the plant.
- Trim runners that are not needed for propagation, ensuring the main plant remains the focus of energy.
- Thin out dense foliage by selectively removing excess leaves to allow for better airflow and light exposure.
Encouraging Pollination Indoors
Promoting year-round fruit production for indoor strawberry plants also involves ensuring adequate pollination. While outdoor gardens often rely on wind and insects for pollination, indoor setups may require some assistance to achieve a successful fruit set.
An easy and effective way to encourage pollination indoors is through manual pollination. By manually transferring pollen from the male to the female flowers, you can ensure that pollen reaches the stigma and fertilization takes place. This technique helps ensure a higher fruit yield and promotes consistent production over time.
When manually pollinating your indoor strawberry plants, keep these tips in mind:
- Gently brush the stamen of the male flowers, collecting pollen on a soft-bristled brush.
- Transfer the collected pollen onto the stigma of the female flowers, mimicking the natural pollination process.
- Repeat the process for each female flower to ensure adequate pollination.
Regularly monitoring the condition of your strawberry plants and maintaining optimal growing conditions, such as providing sufficient light, water, and nutrients, will further contribute to successful fruit production indoors.
Harvesting And Enjoying Your Indoor Strawberries
Growing strawberries indoors can be a rewarding experience, allowing you to harvest and enjoy fresh berries right from your home. With proper care and attention, you can have a bountiful supply of delicious strawberries throughout the year.
Indulging In Fresh, Flavorful Berries
Once your indoor strawberry plants have reached their peak ripeness, it’s time to indulge in the bountiful harvest of fresh, flavorful berries. There’s nothing quite like the taste of homegrown strawberries picked at their prime. The vibrant red color and sweet, juicy flavor are simply unmatched.
To fully enjoy the experience, start by making sure your strawberries are completely ripe before picking them. Look for berries that are a deep shade of red and have a slight sheen to their skin. Gently pinch the berry and feel for a soft texture, indicating ripeness. Avoid harvesting strawberries that are still green or have a pale color, as they may not have reached their full sweetness.
Once you’ve identified which berries are ready for harvest, carefully pluck them from the plants, being cautious not to damage the delicate stems or leaves. Use a pair of small scissors or your fingers to cut the stem about a quarter-inch above the fruit.
When indulging in your freshly picked strawberries, consider slicing them and adding them to a bowl of cold, creamy yogurt. The combination of the tangy yogurt and the sweet berries is a match made in heaven. Alternatively, you can blend the berries with a bit of honey and enjoy them as a refreshing smoothie. Regardless of how you choose to enjoy your indoor strawberries, one thing is certain – their delectable flavor will leave you craving more.
Preserving And Storing The Harvest

Despite their irresistible taste, you may find yourself with an abundance of indoor-grown strawberries. In such cases, preserving and storing the harvest ensures that you can enjoy these delicious berries for longer periods. Preserving strawberries allows you to savor their flavor even when they are out of season.
One simple way to preserve your indoor strawberries is by freezing them.
Here’s a step-by-step guide to freezing your strawberries:
- Rinse the strawberries gently under cold water to remove any dirt or debris.
- Remove the green stems by either cutting them off with a knife or using a strawberry huller.
- Spread the strawberries out on a baking sheet lined with parchment paper, making sure they’re not touching each other.
- Place the baking sheet in the freezer and allow the strawberries to freeze for a few hours, or until they are completely firm.
- Transfer the frozen strawberries into a Ziplock bag or an airtight container, and store them in the freezer for up to six months.
When it comes to using your frozen strawberries, you can easily incorporate them into smoothies, jams, and desserts, or even enjoy them on their own as a frozen treat. The frozen strawberries will retain their delicious flavor, making them a convenient option for fulfilling your strawberry cravings throughout the year.
By harvesting and preserving your indoor strawberry harvest, you can continue to relish the taste of these delightful berries and experience the joy of homegrown fruit, no matter the season.
Frequently Asked Questions Of Growing Strawberries Indoors
Can You Grow Strawberries Indoors?
Yes, you can successfully grow strawberries indoors using containers or hanging baskets. Just ensure they receive at least 6 hours of sunlight daily and provide adequate watering and nutrient-rich soil for optimal growth.
What Are The Benefits Of Growing Strawberries Indoors?
Growing strawberries indoors enables you to enjoy fresh, pesticide-free strawberries year-round. It also allows you to control the growing conditions, including temperature, humidity, and soil quality, leading to healthier and more productive plants.
How Long Does It Take For Strawberries To Grow Indoors?
The time it takes for strawberries to grow indoors varies depending on the variety and growing conditions. Typically, it takes about 4-6 weeks for strawberries to fully develop and ripen after the flowers appear. Continuous care and regular monitoring are crucial for successful indoor strawberry cultivation.
Conclusion
Incorporating strawberries into your indoor garden can be a rewarding and enjoyable experience. With the right knowledge and care, you can harvest fresh, delicious strawberries year-round. Curious about how many potatoes it takes to grow in a bucket? Whether you are a beginner or a seasoned gardener, incorporating strawberries into your indoor garden can add variety and flavor to your home-grown produce, making every harvest more exciting and delicious.
Relevant Ideas: