
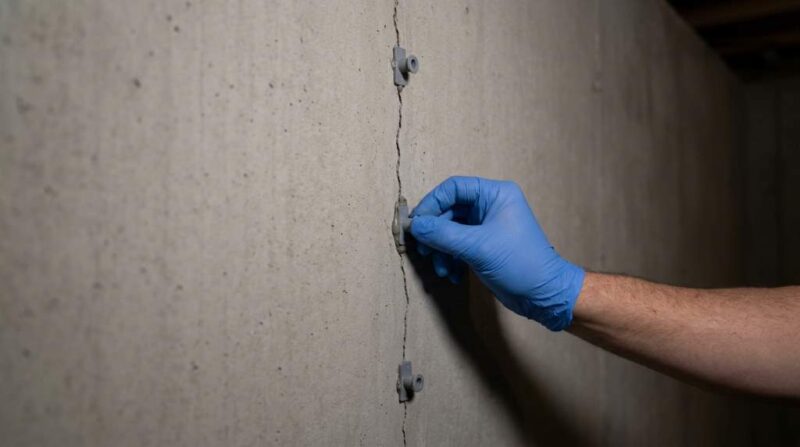
You can fix hairline cracks in a poured foundation using polyurethane or epoxy injection kits. These methods seal the crack from inside and prevent water infiltration effectively. Acting fast stops small cracks from becoming serious structural problems.
Hairline cracks appear in nearly 90% of poured concrete foundations within the first few years. According to structural engineers, even a 1/16-inch crack can allow moisture to seep in over time. Understanding the repair process saves you thousands in future damage costs.
What Causes Hairline Cracks in Poured Foundations?
Concrete naturally shrinks as it cures after pouring. This shrinkage creates tension inside the slab and forms hairline cracks. Most of these cracks appear within the first year after construction.
Soil movement and seasonal temperature changes also cause cracking. Freezing and thawing cycles expand the concrete repeatedly over winter. This stress gradually widens even the smallest surface cracks.
Poor curing practices and low water-to-cement ratios increase cracking risk. Overwatering the mix weakens the concrete’s final strength significantly. Additionally, heavy loads on the surface add downward pressure that stresses the foundation.

Structural vs. Non-Structural Cracks
Hairline cracks thinner than 1/16 inch are typically non-structural. They do not affect the load-bearing capacity of your foundation wall. However, you should still seal them to prevent moisture damage.
Wider cracks, diagonal patterns, or stair-step cracking may indicate structural movement. These require professional evaluation before any DIY repair attempt. Always measure crack width before choosing your repair method.
Tools and Materials You Need Before Starting
Gathering the right supplies makes the repair faster and more effective. You will need a chisel, wire brush, vacuum, and concrete cleaner. Also prepare your chosen injection kit and safety gloves before starting.
For most homeowners, a polyurethane foam injection kit works best for wet or leaking cracks. Epoxy injection kits work better for dry cracks needing structural bonding. Both products are widely available at hardware stores across the country.
When planning repairs on a newer home, reviewing a new construction buying guide helps you understand what foundation warranties cover. Many builders include a structural warranty for the first ten years. Knowing your coverage can save you repair costs entirely.
Step-by-Step: How to Fix Hairline Cracks in Poured Foundation
Follow these steps carefully to seal hairline cracks properly and permanently. Rushing the process leads to failed repairs and recurring moisture problems. Take your time and work in dry weather conditions whenever possible.
Step 1: Clean the Crack Thoroughly
Start by using a wire brush to scrub out loose debris inside the crack. Remove dust, dirt, and any old sealant that has already failed. Then vacuum the area and wipe it clean with a dry cloth.
Avoid using water to clean the crack if you plan to use epoxy. Moisture prevents epoxy from bonding to the concrete surface properly. Let the area dry for at least 24 hours before moving forward.
Step 2: Widen the Crack Slightly (V-Groove Method)
Use a chisel or angle grinder to create a small V-shaped groove along the crack. This gives the sealant more surface area to grip and bond. The groove should be roughly 1/4 inch wide and 1/4 inch deep.
This step is especially important for surface patching with hydraulic cement. The V-groove method dramatically improves how long the repair lasts. If you face tool issues during this step, learning angle grinder motor fixes can keep your project on track.
Step 3: Choose the Right Repair Product
Select your repair material based on crack condition and location:
- Polyurethane foam injection: Best for wet, leaking, or exterior-facing cracks
- Epoxy injection: Best for dry, interior cracks needing structural strength
- Hydraulic cement: Best for fast-setting repairs in actively leaking areas
- Masonry caulk: Best for very fine, non-leaking surface cracks only
Each product has a specific application process printed on its packaging. Always read the manufacturer’s instructions before mixing or applying anything. Using the wrong product on a wet crack causes the repair to fail quickly.
Step 4: Install Injection Ports (For Epoxy or Polyurethane)
Injection ports are small plastic fittings you attach along the crack every 8 to 12 inches. They allow you to push the repair material deep into the crack. Surface ports are easier to use than drill-in ports for most DIY repairs.
Attach the ports using the surface paste that comes with your injection kit. Press each port firmly over the crack and allow the paste to cure. Curing typically takes about 20 to 30 minutes depending on temperature.
Step 5: Inject the Repair Material
Start injecting from the lowest port and work your way upward. Push the material in slowly until it appears at the next port above. Then move the injection nozzle to that next port and repeat.
Continue until all ports are filled and material flows freely through the crack. This process ensures complete filling without air pockets inside. Cap each port with the included plug as you finish injecting it.
Step 6: Allow Full Curing Time
Epoxy typically requires 3 to 5 days to reach full cure strength. Polyurethane foam expands and sets within just a few hours. Avoid any moisture exposure to the repaired area during curing.
After curing, remove the injection port fittings by tapping them sideways. Grind or chisel off any excess material above the surface. Finish by applying a waterproof masonry sealer over the entire repaired section.
How to Apply Hydraulic Cement for Active Leaks
Hydraulic cement is your best option when water is actively seeping through a crack. Mix it according to package directions until it reaches a putty-like consistency. Work quickly because this material sets within 3 to 5 minutes.
Press the mixed cement firmly into the crack using your gloved hands. Hold it in place with steady pressure for at least 3 minutes. The cement will harden even with water present, sealing the leak effectively.
After it hardens, apply a second thin coat for extra protection. Smooth the surface with a damp trowel before it sets fully. Let it cure for 24 hours before painting or applying any waterproof coating.
Waterproofing After the Repair
Repairing the crack is only half the job. Waterproofing prevents future moisture from re-entering the same area. Apply a penetrating concrete sealer or elastomeric waterproof coating over the repaired section.
For interior basement walls, use a crystalline waterproofing product after the crack repair. These products penetrate deep and block moisture at the molecular level. Reapply the sealer every 3 to 5 years for lasting protection.
Drainage Improvements Around the Foundation
Poor drainage causes soil pressure that leads to new cracks over time. Grade the soil away from your foundation at a slope of at least 6 inches over 10 feet. This simple change reduces hydrostatic pressure significantly.
Clean gutters regularly and extend downspouts at least 6 feet from the house. Consider installing a French drain if you have persistent water pooling issues. These drainage solutions work alongside your crack repair for long-term results.
When to Call a Professional
Some cracks signal serious structural problems that need expert evaluation. Call a licensed structural engineer if you notice horizontal cracks in basement walls. Horizontal cracks indicate soil pressure and potential wall failure risk.
Also seek professional help if cracks are wider than 1/4 inch or growing rapidly. Stair-step cracks in block or brick alongside poured concrete also need inspection. Early professional intervention costs far less than full foundation replacement later.
Preventing Future Hairline Cracks
Prevention is always cheaper than repair. Keep the soil around your foundation consistently moist to minimize shrinkage and settlement. Avoid planting large trees near the foundation, as roots create soil movement over time.
Check your foundation walls every spring and fall for new cracking. Catching hairline cracks early means simpler and cheaper repair methods. Use a flashlight to inspect the full perimeter of your basement walls carefully.
Consider applying a concrete sealer to the exterior foundation surface every few years. This protective layer reduces freeze-thaw damage significantly. Combining interior and exterior sealing gives your foundation maximum protection year-round.
Conclusion
Fixing hairline cracks in a poured foundation is a manageable DIY project with the right tools and materials. Polyurethane or epoxy injection methods offer the most durable results for most homeowners. Acting early prevents small cracks from turning into expensive structural failures.
Take time to clean, prepare, and seal every crack properly for lasting results. Follow up with waterproofing and improve your drainage to stop new cracks from forming. Start your foundation inspection today and protect your home’s structural integrity for decades to come.
Frequently Asked Questions
Are hairline cracks in a poured foundation dangerous?
Most hairline cracks are non-structural and not dangerous, but they should be sealed promptly to prevent moisture intrusion.
Can I use regular caulk to fill hairline cracks in my foundation?
Masonry-specific caulk works for very fine surface cracks, but epoxy or polyurethane injection provides a far more durable seal.
How long does an epoxy injection repair last on a foundation crack?
A properly applied epoxy injection repair can last 20 years or more when the crack is clean, dry, and correctly prepared.
Do hairline foundation cracks affect home resale value?
Unrepaired foundation cracks can reduce buyer confidence and lower home value, but professionally repaired cracks generally do not.
How much does it cost to professionally fix hairline cracks in a foundation?
Professional crack injection repair typically costs between $400 and $800 per crack depending on length, severity, and your local market.
